How to Stack and Secure Compact Appliances on Small Countertops: A Step‑by‑Step Guide
Introduction
One often finds that a modest kitchen countertop becomes cluttered with a microwave, coffee maker, toaster and other small appliances. This guide explains how to create a stable, ergonomic arrangement that maximizes usable surface area while preserving safety. Readers will learn to assess countertop dimensions, select appropriate supporting stands, and secure each appliance to prevent tipping. The result is a tidy workspace that enhances cooking efficiency and reduces the risk of accidents.
The techniques described are applicable to apartments, dormitories and any environment where counter space is at a premium. By following the steps, one can transform a chaotic countertop into a streamlined station suitable for daily meal preparation and occasional entertaining.
What You’ll Need
- A sturdy microwave stand or multi‑tier rack (see product recommendations below).
- Non‑slip rubber pads or silicone mats.
- Adjustable leveling feet (often included with the stands).
- Basic tools: a Phillips screwdriver and a measuring tape.
- Optional: a small utility knife for trimming packaging.
Step 1: Measure Your Countertop and Appliances
Begin by measuring the total length, width and height of the countertop surface. Record the dimensions in centimeters for precision. Next, measure each appliance that will be placed on the stand, noting the width, depth and weight. This information determines whether a stand can accommodate the load and fit within the available space.
When measuring, include any protruding handles or knobs, as these affect clearance. It is advisable to leave at least two centimeters of free space on each side of the stand to allow air circulation and ease of cleaning.
Having accurate measurements prevents the need for later adjustments and ensures that the chosen stand will support the appliances safely.
Step 2: Choose the Appropriate Stand
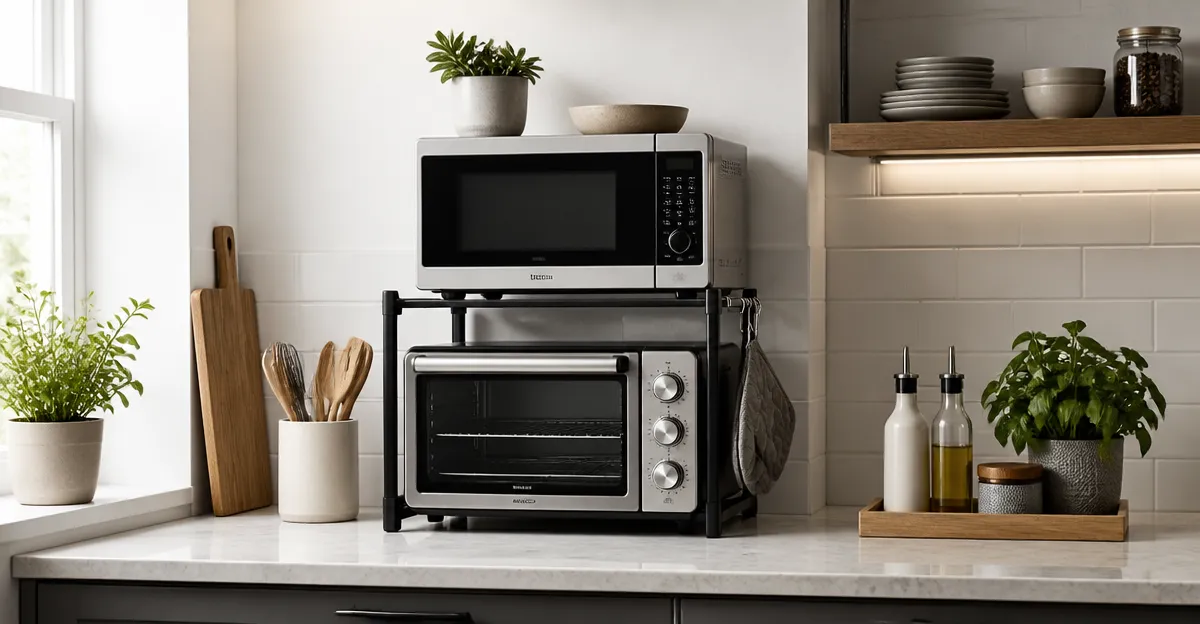
Based on the measurements, select a stand that offers both sufficient weight capacity and adjustable dimensions. For most compact kitchens, the NETEL Expandable Microwave Stand provides a versatile solution. It extends from 15.7 to 25.2 inches in length and offers two tiers, allowing a microwave on the lower shelf and a coffee maker on the upper shelf. The carbon‑steel construction, coated with an anti‑rust finish, supports up to 55 lbs, which covers most countertop appliances.
If a drawer for utensils is desired, the MNROIUR Adjustable Microwave Stand with Drawer includes customizable drawer dividers and a 200‑lb capacity frame. Its 360° rotating feet level uneven surfaces, making it ideal for older countertops that are not perfectly flat.
For users who require built‑in power outlets, the DUMOS Bakers Rack with Power Outlet integrates three AC sockets and an on/off switch, eliminating the need for extension cords. The rack’s X‑shaped crossbars and adjustable feet provide wobble‑free stability, supporting up to 55 lbs.
Each of these products addresses a specific need: basic shelving, integrated storage, or built‑in electricity. Selecting the appropriate stand reduces the likelihood of over‑loading and improves workflow.
Step 3: Assemble the Stand
- Unpack all components and lay them on a clean surface.
- Follow the included instruction sheet; most stands require only a few screws and an Allen wrench.
- Adjust the length by sliding the telescoping sections until the desired measurement matches the countertop space.
- Secure the adjustable feet by turning them clockwise until they contact the countertop evenly.
- For the DUMOS rack, connect the power cord to a nearby outlet before positioning the unit.
Assembly typically takes less than ten minutes, and the process does not require drilling or permanent modifications to the countertop. Ensure that all bolts are tightened to the recommended torque to prevent loosening during use.
Step 4: Position the Stand on the Countertop
Place the assembled stand in the measured location, aligning it with the free‑space margins identified earlier. Press non‑slip rubber pads beneath each foot to increase friction and protect the countertop surface from scratches.
Use a level to verify that the top surfaces of both tiers are horizontal. If the countertop is uneven, adjust the leveling feet until the stand is perfectly level. A level surface prevents appliances from sliding or tipping when the door of a microwave is opened.
Once the stand is stable, step back and visually confirm that there is adequate clearance for opening appliance doors and for safe hand movement.
Step 5: Load Appliances Strategically
Place the heaviest appliance, typically the microwave, on the lower tier. Center the microwave so that its weight is evenly distributed across the shelf. Verify that the microwave’s ventilation openings are not obstructed by the stand’s frame.
Arrange lighter items, such as a coffee maker, toaster or blender, on the upper tier. If using the MNROIUR stand, store cutlery and baking tools in the built‑in drawer to keep the countertop clear. For the DUMOS rack, plug the coffee maker into one of the integrated outlets, ensuring that cords do not dangle over the edge of the stand.
After loading, gently push each appliance to test stability. No wobble should be detected; if any movement occurs, re‑adjust the feet or reposition the appliance.
Step 6: Secure Appliances to Prevent Accidents
Even with a stable stand, sudden movements can cause an appliance to slide. Apply non‑slip silicone mats directly beneath the base of each appliance. These mats increase friction without damaging the appliance finish.
For microwaves with a built‑in turntable, ensure that the turntable is correctly seated to avoid imbalance. If the stand includes a safety strap or anti‑tip kit (as offered with the DUMOS rack), attach it according to the manufacturer’s instructions.
Regularly inspect the securing elements, especially after cleaning, to maintain safety over time.
Tips & Pro Tips
- Maintain at least two centimeters of clearance behind each appliance to allow heat dissipation.
- When possible, position the stand near a wall outlet to reduce the length of power cords.
- Use a small handheld vacuum to remove dust from the stand’s underside; dust accumulation can affect stability.
- For apartments with limited storage, consider folding the stand when not in use; the NETEL stand folds flat for easy storage.
- Label each power cord with a tag to avoid confusion when multiple appliances share the same outlet.
Troubleshooting
| Problem | Possible Cause | Solution |
|---|---|---|
| Stand wobbles after loading appliances | Uneven countertop or improperly tightened feet | Adjust each foot individually until the level indicates a flat surface; use rubber pads for added grip. |
| Appliance slides off shelf | Insufficient friction or over‑loading | Place silicone non‑slip mats beneath the appliance and verify that the total weight does not exceed the stand’s rated capacity. |
| Power outlets on DUMOS rack are not reachable | Stand positioned too far from wall outlet | Relocate the rack closer to the wall or use a short, heavy‑gauge extension cord rated for kitchen appliances. |
Conclusion
By measuring the workspace, selecting a suitable stand, assembling it correctly, and securing each appliance, one can achieve a safe and efficient countertop layout even in the smallest kitchens. The recommended products—NETEL Expandable Microwave Stand, MNROIUR Adjustable Microwave Stand with Drawer and DUMOS Bakers Rack with Power Outlet—provide reliable tools that simplify the organization process. Implementing the steps outlined in this guide will result in a clutter‑free countertop, improved workflow, and reduced risk of accidents.
Products Mentioned in This Guide
Frequently Asked Questions
How do I measure my countertop to determine the best appliance layout?
Measure the length, width, and depth of the usable surface, then sketch a simple diagram noting each appliance’s footprint.
What type of stand is safest for stacking a microwave and coffee maker?
A sturdy, metal multi‑tier rack with adjustable leveling feet and weight‑rated capacity is ideal.
Can non‑slip rubber pads prevent appliances from tipping?
Yes, placing pads under each unit adds friction and cushions vibrations, reducing tip‑over risk.
How do I secure appliances to the countertop to avoid movement?
Use removable brackets or double‑sided mounting tape to anchor the base to the countertop, ensuring easy removal.
Do I need special tools to install leveling feet on appliance stands?
A standard Phillips screwdriver is sufficient for most adjustable foot kits.