How to Secure an Air Fryer in Your RV: Step‑by‑Step Guide to Prevent Tipping During Travel
Introduction
Traveling in a recreational vehicle (RV) offers freedom, but it also introduces unique challenges for kitchen appliances. An air fryer, such as the Carori Air Fryer, provides quick, healthy meals on the road. However, the motion of an RV can cause the appliance to shift, tip, or even damage surrounding cabinets. This guide explains how to secure an air fryer safely, protect both the device and the vehicle, and enjoy hassle‑free cooking wherever the road leads.
Readers will learn which materials are essential, how to create a stable mounting system, and best practices for packing and traveling with the appliance. By following these instructions, one can avoid costly repairs, maintain food safety, and preserve the interior finish of the RV.
What You’ll Need
- Non‑slip rubber mat or silicone pad
- Velcro strap set or adjustable tie‑downs
- MaxBrothers Moving Straps (2‑person lifting straps)
- Heavy‑duty suction cups (optional for additional grip)
- Measuring tape
- Drill with appropriate bits (if permanent brackets are desired)
- Protective gloves (included with the moving straps)
Step 1: Choose the Optimal Placement
Begin by selecting a flat, level surface within the RV kitchen. The ideal spot is near a countertop edge where the air fryer can sit on a sturdy base without obstructing other appliances. Measure the width, depth, and height of the Carori Air Fryer (6 qt, 1700 W, 400 °F max) to ensure clearance for the viewing window and basket handle. Position the fryer so that the viewing window faces outward, allowing easy monitoring while cooking.
Why this matters: Placing the fryer on a level surface reduces the likelihood of lateral movement during turns. A well‑chosen location also minimizes the need for excessive tie‑downs, preserving interior aesthetics.
Step 2: Add a Non‑Slip Base
Lay a silicone or rubber mat that matches the dimensions of the fryer’s basket. The non‑stick, dishwasher‑safe basket of the Carori Air Fryer can become slippery when the RV is in motion. A high‑traction mat prevents sliding while allowing the basket to be removed for cleaning.
Recommended product: a 12‑inch thick silicone kitchen mat (not listed above) works well, but any high‑grip mat will suffice. Ensure the mat is secured to the countertop with a few small double‑sided tape strips to avoid shifting.
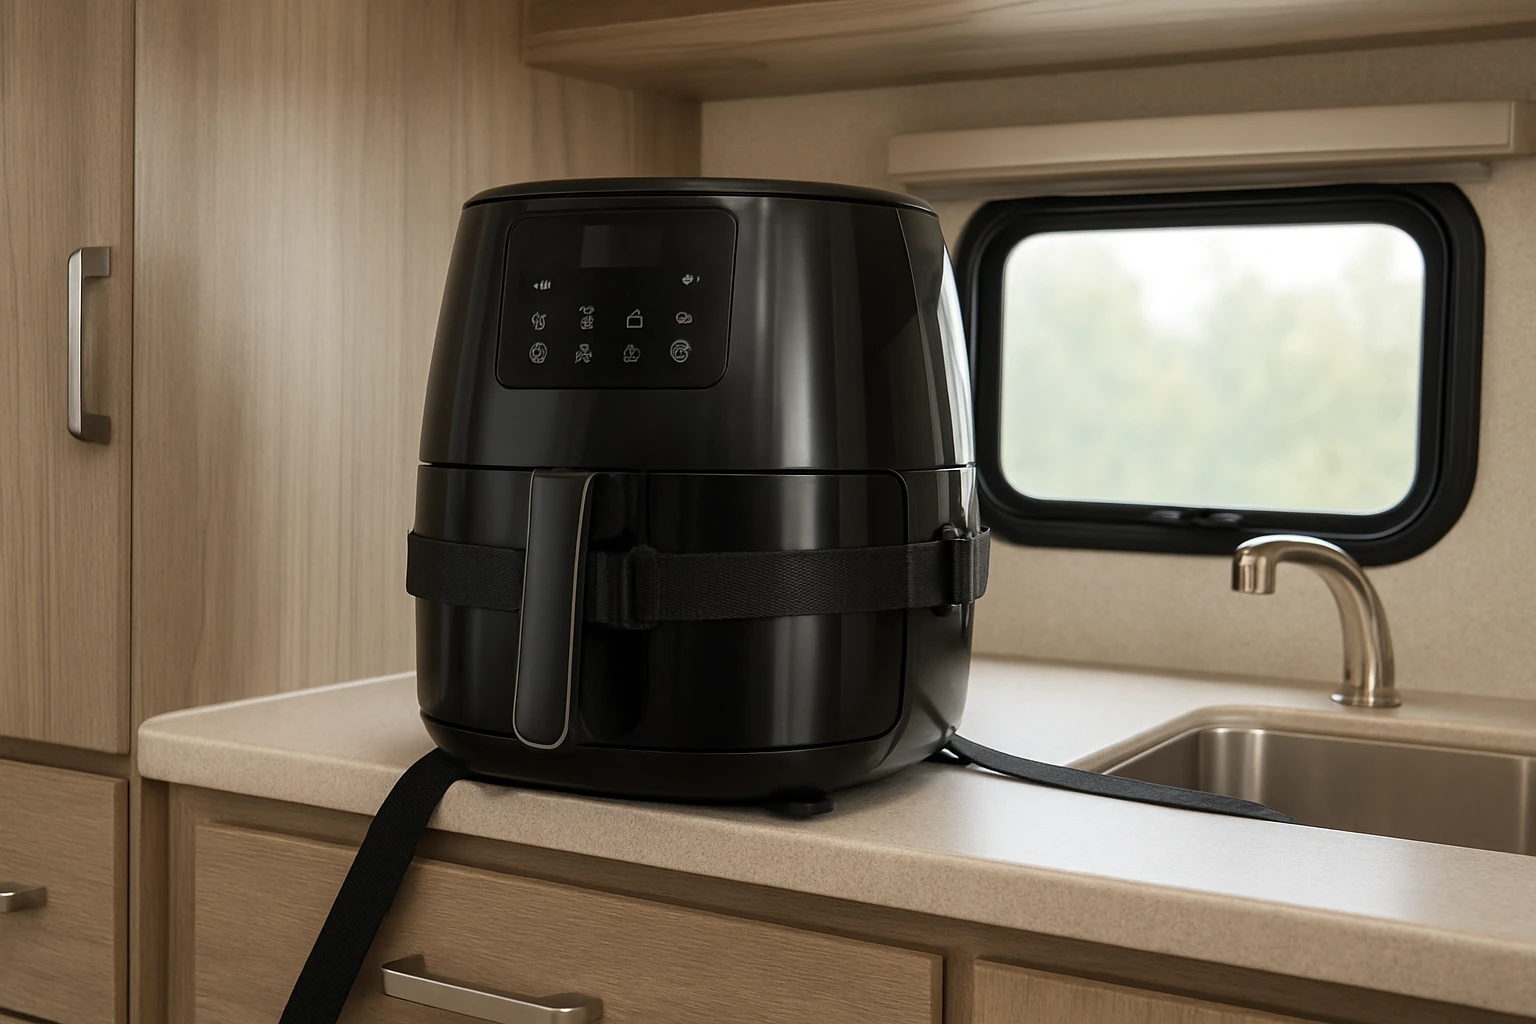
Step 3: Secure the Appliance with Adjustable Moving Straps
Wrap the MaxBrothers Moving Straps around the air fryer’s central body, not the basket. These straps are constructed from high‑quality nylon, feature adjustable buckles, and can support up to 800 lb, far exceeding the fryer’s weight (approximately 15 lb). The included non‑slip gloves make tightening safe and comfortable.
How to use:
- Thread each strap through the designated loops on the fryer’s outer frame.
- Pull the straps snugly, ensuring the fryer remains upright.
- Lock the buckles and double‑check tension; the straps should hold the fryer firmly without crushing it.
Why this product: The adjustable nature allows unlimited range of motion, adapting to different RV layouts. Its heavy‑duty rating guarantees that sudden stops or sharp turns will not dislodge the appliance. Additionally, the included storage bag keeps the straps organized when not in use.
Step 4: Anchor the Straps to Fixed Points
Identify sturdy anchor points within the RV, such as metal brackets under the countertop, built‑in tie‑down rails, or reinforced cabin walls. Loop the free ends of the moving straps through these anchors and tighten using the built‑in cam buckles. If the RV lacks permanent anchors, consider installing removable suction cup hooks that can bear the strap’s tension.
Tip: Position the anchor points symmetrically on both sides of the fryer to distribute force evenly, reducing stress on the appliance’s housing.
Step 5: Test Stability Before Departure
With the fryer secured, perform a gentle shake test. Apply pressure from each side to simulate the forces experienced during cornering. Observe whether the viewing window remains steady and whether the straps maintain tension. If any movement is detected, re‑tighten the straps or add an extra silicone mat underneath.
After confirming stability, close the RV’s doors and drive a short distance at low speed. Re‑inspect the straps after the first few minutes of travel; the initial vibration may settle the tension.
Step 6: Prepare for Long‑Term Storage (Optional)
When the RV is not in use for an extended period, it is prudent to store the air fryer in a protective case. The Carori Air Fryer features a removable, dishwasher‑safe basket that can be cleaned and dried before storage. Place the fryer on a dry shelf, secure it with the moving straps, and cover it with a breathable fabric to prevent dust accumulation.
Tips & Pro Tips
- Weight Distribution: Keep heavier items, such as the air fryer, low and centered to maintain the RV’s center of gravity.
- Regular Inspection: Check strap tension weekly; nylon can stretch over time.
- Heat Safety: Ensure the fryer’s exhaust vents are not obstructed by the mat or straps.
- Back Protection: Wear steel‑toe shoes and back support when installing straps, as recommended by the moving‑strap manufacturer.
- Alternative Fastening: For permanent installations, consider stainless‑steel brackets that bolt to the countertop; however, this reduces flexibility for future layout changes.
Troubleshooting
| Problem | Possible Cause | Solution |
|---|---|---|
| Fryer slides during a turn | Insufficient mat grip or loose straps | Replace the mat with a higher‑traction silicone pad and re‑tighten the moving straps. |
| Straps loosen over time | Nylon stretch or buckle slippage | Re‑adjust the buckles after each trip; consider using a lock‑tightening clip. |
| Viewing window fogs | Improper ventilation | Ensure the exhaust vent is clear and allow the fryer to cool before covering. |
Conclusion
Securing an air fryer in an RV does not require complex engineering; a well‑chosen placement, a non‑slip base, and high‑quality moving straps provide a reliable solution. By following the six steps outlined above, one can prevent tipping, protect the appliance, and enjoy nutritious meals on the road. Remember to inspect the setup regularly and adjust as needed for different travel conditions.
With the Carori Air Fryer and the MaxBrothers Moving Straps, the RV kitchen becomes a safe, efficient space for culinary creativity.
Products Mentioned in This Guide
Frequently Asked Questions
What is the simplest way to stop an air fryer from tipping while driving?
Place a non‑slip rubber or silicone mat under the fryer and secure it with Velcro straps or adjustable tie‑downs to the RV cabinet.
Which materials are essential for safely mounting an air fryer in an RV?
A non‑slip rubber mat, Velcro strap set or tie‑downs, and optional corner brackets or a small shelf for added stability.
How do I attach Velcro straps to keep the air fryer steady?
Wrap the strap around the fryer’s base, press the Velcro ends together, then anchor the other end to a fixed cabinet rail or tie‑down point.
Can I store the air fryer when not cooking, and how should I secure it?
Yes—keep it on the same non‑slip mat and re‑tighten the straps or use a removable bracket so it stays fixed during travel.
Will securing the air fryer affect its cooking performance?
No; the straps only hold the unit in place and do not interfere with airflow or heating when the fryer is in use.